Tuesday 10 November 2009

Joost doon't 'ave the poower!

I made the adapter cable with the Deans connectors (cut off the end of the umbilical) and 4mm bullets fitted to mate with the Li-Po. I didn't know how charged the battery was, but I had to try it...

With just the battery (no extra weights) I powered up and "hovered" for a minute or so; all 3 EDFs running and plenty of power. I then added the 2 blocks of metal again. These are just bits I've been using to help in the construction so far, as weights or a square-edge. So powering again, it got off the ground but was obviously loaded. Second attempt and it just got off the ground and I hit max on the controller. I backed off, then tried again - now barely lifting. I took off the heavier block and re-tried - only slightly better. The battery must be dead! As I said; I don't know what the state of charge was beforehand and the charger hasn't arrived yet...

Disheartened by the sub-60 second runtime, I was thinking the battery couldn't have been charged. I wasn't expecting much, maybe 2 or 3 minutes. I also thought I should check and quantify the "other stuff", so went off to weigh the 2 blocks. They were a lot heavier than I thought: the larger block of aluminium was 335g and the smaller stainless steel block was 414g! For comparison, the battery is 408g (listed as 412g). That made me feel a little better; I'd added a lot more than necessary, an additional 759g (1.65lb for those working in old money). So fingers-crossed; if I can keep the weight of all that "other stuff" down and with a fully charged battery, it might just work... for a couple of minutes.

Monday 9 November 2009

Battery and tail

A colleague pointed out that I should get a battery sooner rather than later, so I don't waste my effort if the battery can't provide enough juice to lift off. So I ordered one: Li-Po 5000mAh 20C, 30C for ten seconds. That's 100A continuous and 150A burst. Doesn't sound feasible! We'll see.


I got the upper tail fins finished and fitted. They're mostly for show. They may help in forward flight, but I'm no aero-engineer. I'm working on gut-feel!


With as much as possible fitted and two lumps of metal for "some other stuff", it weighs in at 2kg.


Wednesday 4 November 2009

Clarification

I thought I should clarify that although I'm using some RC gear, I'm not using RC in the traditional sense. I have no transmitter or receiver as a couple of MCUs will be doing the work, these will have a radio link to a base station of some kind where the operator can monitor and guide the aircraft. Any operator inputs will feed in to the control loop as error offsets rather than direct control of servos. At least, that's the plan...

Monday 2 November 2009

More parts: sensors and transceivers

Thanks to the guys at Sparkfun I'm now the proud owner of three Maxbotix LV-EZ0 ultrasonic range finders and a pair of nRF2401A transceivers with trace antennas. Now the only thing stopping me is time (and perhaps my coding skills) as I have all the main components I need to get things flying, but between work, studies and family my spare time is limited. I ask anyone following this to please be patient, and keep sending words of encouragement!

Follow the video from the previous post on YouTube as it links to some other interesting videos.

I'm going to attempt to finish the tail this week and start work on the control system.

Sunday 25 October 2009

My first YouTube video! - for those who asked...


This is just a quick vid showing just one of the EDFs powered, controlled manually with a servo controller. I didn't have enough power available for all three. This is just to get a feel for it.

Feel free to leave comments.

Sunday 18 October 2009

Gear mounts and tail test fit

I've got the L/G mounts sorted and hacked up the lower tail fins. I still have the L/G arms to fabricate and it's starting to get heavy! I'm not going to add any control surfaces to the tail yet (if at all), or actuate the L/G, as I'd like to have a stab at some kind of controlled flight as soon as possible. I do think I'll need control vanes on the rear EDF though.


Sunday 4 October 2009

L/G rework and accelerometers

I've been feeling off-colour this week so haven't got much done. I stripped a lot of the L/G from the airframe because I wasn't happy with it. I have thought of a way around the issues and will try to implement them next. This will give me a tidier, stronger end result.

I also dug out my Dimension Engineering DE-ACCM3D 3-axis accelerometer that I'd bought for a previous project and never got round to using. I hooked it up to my MiniLab 1008 (USB DAQ device) to re-familiarise myself with it. The DE-ACCM3D works fine but I seemed to be getting really slow, crappy resolution from MiniLab. I'm sure it was OK before...

Monday 28 September 2009

Rework and headaches


I've reworked the nacelle steerer setup because I wasn't happy with the gears, and it wasn't working as I'd planned. The servos used here are old cheapo ones but one is modifed to work in reverse. I can't remember how I did this (I'll post it when I remember) but it was convenient as the same signal can applied to both servos to make the nacelles turn the same way.

The first front leg is fixed in place and a rear one is getting there. I abandoned the vertical offset angle just for simplicity, as I'd like to move on to the flight systems.

Next: finish L/G and start on tail.

Thursday 24 September 2009

Micro servos arrive!

How small are these? I got 8 micro servos from eBay for use on the light-weight jobs (steering vanes, pan & tilt etc). The servo on the left is a "standard" size and the new "9g" servo on the right, which is smaller than I imagined.


What does it all mean!

I've been asked what some of the acronyms and abreviations mean. I assumed the reader would have a similar level of knowledge, but this is not the case, and I appologise. In the side bar >>> you'll find a list, which will hopefully make things a little clearer.
I haven't yet got to the stage of talking about the FPV system with OSD while the AP and IMU does it's thing with the EDFs via the ESCs ;-)
I'll add more as and when they come up, or are requested.

Sunday 20 September 2009

L/G - doing things the hard way

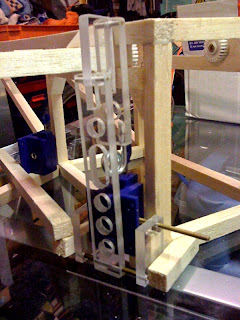
Because I want a cargo ramp on the bottom, to allow for a small rover, the ground clearance has to be quite high. I also want the L/G to be sprung to absorb the impact of touchdown, and they'll have to fit at in a tight spot at an odd angle (both vertically and horizontally).

I've spent hours trying to figure out how I want these to mount.


I used the drawing (see previous post) as a template for the parts.

The mock-up of the mech works as expected (shown below, without the "leg" part attached).


They'll be painted eventually.


I had to make a small mod to stop the coil spring clashing with the lower arm.


I think I'll have to make it a bit shorter too.

Landing gear design

I've been working on the design for the landing gear. I had a specific style in mind and it will have to provide enough ground clearance for the payload ramp, some sprung shock absorbtion and work with the odd body angles in the planned loaction. I'll make some parts to check that the concept works and won't conflict with anything before making all of them. I also need to check for conflicts with the nacelle steerer servos.

Friday 18 September 2009

Nacelle shaft drives

It's a bit tight in there, but the servo drives are coming along. The gears are from an old printer. I'm not entirely happy with this setup though. Can't put my finger on why...


Saturday 12 September 2009

First nacelle

It took me a while to figure out how I was going to do the steerable arms for the two front EDFs. What I came up with seems pretty strong, and will allow a servo to adjust the angle from inside the main body. I only want the end section with the EDF to rotate, not the whole arm. Distance between centres of each EDF is 500mm.

Friday 11 September 2009

Work starts on airframe

I started out using wood glue, but it took forever to go off. So I switched to hot-melt and that seems to work a treat.
Still plenty to do, and even with the EDF held in place with just a couple of small bulldog clips, I couldn't resist powering it up... makes me grin everytime!

Thursday 3 September 2009

Balanced rotors

I tried balancing the rotors with slivers of electrical tape (as I'd seen done on YouTube) but they appeared to be more out-of-balance than I thought. I ended up balancing the rotors with "Blu-Tack", adding a little each time.
Sorry about the poor image quality (damn iPhone).

I mounted the balanced rotors back in their housings and powered up for another test. This time I had a current meter set up to measure total current. Although the balancing still isn't perfect it is a huge improvement, with much less vibration evident. I ramped up the power and the rig started to get light. The current clamp showed ~20A. By ~30A the rig was "hovering". Amid the noise, wind and threat of exploding plastic; I dared to wind up the power some more and at ~64A the rig was actively trying to reach the ceiling. That was just before one of the rotors whizzed passed my head! I'd secured the rotors to the "shaft", but neglected to check if the rotor adapters were tight on the motor shaft. Luckily, no damage done. I'm sure I've barely reached half "throttle".
Next job: tighten shaft adapters and start on stiffer airframe.

Wednesday 2 September 2009

Test rig - quick and dirty

This is the rig I threw together to get a feel for the how the as yet un-balanced EDFs would perform (I couldn't wait). The sealed lead acid battery is in parallel with the PSU to help iron out the sags.
The rig showed me how powerful these are, and how important it will be to get the balancing right. I did manage to power up all three but had to back off due to some serious vibration. I think the frame didn't help as the lack of rigidity allowed any vibration to resonate.
Must balance rotors!

Saturday 29 August 2009

Initial EDF power-up

I soldered up the motor and ESC connectors for each, to check they all work. I hooked up a 12V 18A power supply (the biggest I have) and used the servo tester to provide the control signal. The first one ran the wrong way as I had the motor connections swapped - easily sorted (and now labelled). I couldn't spin them up to max because the PSU hit current limit and the voltage sagged to a point where the ESCs cut out, but wow, I was impressed! They each seemed pretty well balanced up until just before the cut-off point where some high frequency vibration was observed. Can't wait to run them properly, so I'll have a crack at balancing them next, and fixing them into a triangular test rig. To run all three at once; I'll need a higher power PSU too.

System Block Diagram

Here's my first draft of the system block diagram. It will help me see the bigger picture when working on the system components. These are just a brain-dump and aren't set in stone.
eBay update
My 3.5mm gold connectors and servo/ESC tester have arrived. Will give the tester a go tomorrow, try to get an EDF going.

Tuesday 25 August 2009

EDFs arrive!

A smaller than exected parcel was on my desk when I got home from work today. Inside were the three plastic fans/housing with motors already mounted and aluminium radial cooling fans on the back. There was even a small Allen key supplied for each. Also in the box were three 40A ESCs complete with BEC and a small bag with mating half connectors and heatshrink tubing, even though the eBay lot was shown and described as "no connectors" (9 days from Hong Kong!). There was also the "free gifts" - three mini keyring torches, which I may rob the LEDs from. I inspected each of the EDF units for transit damage and all looked OK.


I haven't currently got a way of providing the ESCs with a signal so I can't test them yet (servo tester on order). There was a little plastic flash from the injection moulding process which was easily trimmed with my trusty Swiss Army knife. I guess they'll need balancing before I stick any serious power through them. Can't wait to try them!

Thursday 20 August 2009

Make Magazine - good timing

The latest issue of Make came through, with a UAV theme! They put me on to DIY Drones, which I'll have to check out properly, along with RC Groups.
Links in the sidebar >>

Monday 17 August 2009

EDFs, BLDC motors and ESCs

On past projects I'd always try to do everything for the absolute bare minimum in terms of money spent. This often lead to long delays as I had to do everything the hard way. This time round I've had to admit that I shouldn't re-invent the wheel (making my own ESCs for example) when I can make better progress by using off the shelf components and stitch it all together with my own stuff where needed.
Even though Dave Powers says that VTOL with EDFs is very difficult to do (and he has much more experience than I do), I still feel it's within my ability. And after all, I do seem to like to make life difficult for myself!
eBay!
I found some 90mm EDF units complete with 3600kV BLDC motor and 40A ESC for a very reasonable price on eBay. They're from Hong Kong, so when they finally arrive, they may not be the best, quality wise, but they'll get me started. I've got three sets on order, for about the same price as one set if bought separately through hobby websites or high street hobby shops. eBay has also provided:
  • 2 pairs of mechanical retracts for the landing gear.
  • 20 pairs of 3.5mm gold connectors for motors/ESCs.
  • Servo tester to aid early tests and setup.
I won't need batteries and charger until much later, I'll use an umbilical during development. I think most of the construction will use carbon tube, balsa and plastic sheet and extrusions.
Fingers-crossed everything turns up, and in working order.

Scribbles for my mind

To help me get things straight in my mind, I sketch with that old fashioned pen and paper stuff! I have to get a feel for whether I could make it without huge complications or expense.
I thought about props and motors for lift but I wasn't quite happy with the look that they would give. I really wanted something like a ducted fan, so I Googled. I found EDFs (electric ducted fans) that hadn't really been around (common or affordable at least) when I was last crashing RC aircraft. I found the largest size, common enough not to be "specialist", was about 90mm diameter and could provide well over 1Kg of thrust. Not bad.
In order to see what was out there and how things had changed, I searched YouTube. I found Dave Powers and Co (of rcpowers.com) doing some really useful guides and general videos proving that RC planes don't have to be perfect precision machines in order to fly. Dave regularly uses tape, glue and junk to get his aircraft back in the sky. He earns the first linky-link in the sidebar ;-). Check out his videos.

Project Intro

For fun, I'd like to scratch build a VTOL platform that self stabilises (not requiring input from a human), is capapable of autonomous take-off and landing and can be used as an "eye in the sky" as well as for fun. I'm not going after long ranges or runtimes, but do fancy a bit of a Sci-fi look.

It will take a range of skills and fair amount of cash - lets hope I have enough of both! I have limited experience with RC planes and helis, and that was a while ago too. Google and YouTube are my research friends. I plan to log it all here, but I'm making no guarantees that it will ever fly.