Showing posts with label Airframe. Show all posts

Friday, 13 August 2010

Mr Parker - I thank you...

I got a good telling-off today, by Mr Parker. He said I'm spending all my time planning my revision timetable and not actually revising (working on the L/G - he wants to see it fly). I should just use a couple of bent wire coat hangers and be done with it.

So, I got home tonight, determined to get a chunk of work done on the legs. I want to get some gear in place for the thing to sit on, so it's doesn't rock and skate around (in theory at least). But you are right, Mr P, so I worked like a crazy man...


I got the rear vertical pieces cut out, sanded, drilled and tapped, then drilled the Alu knees of the rear pair. In a flash of genius I solved the anchor and adjustment problem for the tensioners, so they now operate correctly. I've ditched the LEDs too (for now).

I can lock-out the gear (manually locked in deployed position) and move on...

Everything will need dressing up a bit.

Time to work towards a controlled lift-off and touch-down cycle.


Thursday, 12 August 2010

Fiddly legs

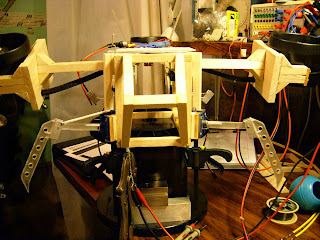
I've finished the front pair of landing legs, at least the component parts. I still need to find a neat way to secure the operating linkage, and operation isn't very smooth either. It's really fiddly!
I've been messing with adding lighting to the legs, but I'm not convinced about the effect (lighting not shown in photo).

The leg on the left has the tensioner, LED and wiring in place. Additional wiring will be needed if I add a Weigh-On-Leg sensor.

Sunday, 23 May 2010

One leg done, three to go!

I've fixed the slider to the pivot arm...


...and fixed the shaped vertical "foot"(?) to the slider mech, then temporarily fitted it into the airframe to test the fit. While I was at it, I clamped a servo in place and connected a pushrod to the retract control linkage, then plugged in the servo controller for a demo (see video, below).

Tuesday, 10 November 2009

Joost doon't 'ave the poower!

I made the adapter cable with the Deans connectors (cut off the end of the umbilical) and 4mm bullets fitted to mate with the Li-Po. I didn't know how charged the battery was, but I had to try it...

With just the battery (no extra weights) I powered up and "hovered" for a minute or so; all 3 EDFs running and plenty of power. I then added the 2 blocks of metal again. These are just bits I've been using to help in the construction so far, as weights or a square-edge. So powering again, it got off the ground but was obviously loaded. Second attempt and it just got off the ground and I hit max on the controller. I backed off, then tried again - now barely lifting. I took off the heavier block and re-tried - only slightly better. The battery must be dead! As I said; I don't know what the state of charge was beforehand and the charger hasn't arrived yet...

Disheartened by the sub-60 second runtime, I was thinking the battery couldn't have been charged. I wasn't expecting much, maybe 2 or 3 minutes. I also thought I should check and quantify the "other stuff", so went off to weigh the 2 blocks. They were a lot heavier than I thought: the larger block of aluminium was 335g and the smaller stainless steel block was 414g! For comparison, the battery is 408g (listed as 412g). That made me feel a little better; I'd added a lot more than necessary, an additional 759g (1.65lb for those working in old money). So fingers-crossed; if I can keep the weight of all that "other stuff" down and with a fully charged battery, it might just work... for a couple of minutes.

Monday, 9 November 2009

Battery and tail

A colleague pointed out that I should get a battery sooner rather than later, so I don't waste my effort if the battery can't provide enough juice to lift off. So I ordered one: Li-Po 5000mAh 20C, 30C for ten seconds. That's 100A continuous and 150A burst. Doesn't sound feasible! We'll see.


I got the upper tail fins finished and fitted. They're mostly for show. They may help in forward flight, but I'm no aero-engineer. I'm working on gut-feel!


With as much as possible fitted and two lumps of metal for "some other stuff", it weighs in at 2kg.


Sunday, 25 October 2009

My first YouTube video! - for those who asked...


This is just a quick vid showing just one of the EDFs powered, controlled manually with a servo controller. I didn't have enough power available for all three. This is just to get a feel for it.

Feel free to leave comments.

Sunday, 18 October 2009

Gear mounts and tail test fit

I've got the L/G mounts sorted and hacked up the lower tail fins. I still have the L/G arms to fabricate and it's starting to get heavy! I'm not going to add any control surfaces to the tail yet (if at all), or actuate the L/G, as I'd like to have a stab at some kind of controlled flight as soon as possible. I do think I'll need control vanes on the rear EDF though.


Sunday, 4 October 2009

L/G rework and accelerometers

I've been feeling off-colour this week so haven't got much done. I stripped a lot of the L/G from the airframe because I wasn't happy with it. I have thought of a way around the issues and will try to implement them next. This will give me a tidier, stronger end result.

I also dug out my Dimension Engineering DE-ACCM3D 3-axis accelerometer that I'd bought for a previous project and never got round to using. I hooked it up to my MiniLab 1008 (USB DAQ device) to re-familiarise myself with it. The DE-ACCM3D works fine but I seemed to be getting really slow, crappy resolution from MiniLab. I'm sure it was OK before...

Monday, 28 September 2009

Rework and headaches


I've reworked the nacelle steerer setup because I wasn't happy with the gears, and it wasn't working as I'd planned. The servos used here are old cheapo ones but one is modifed to work in reverse. I can't remember how I did this (I'll post it when I remember) but it was convenient as the same signal can applied to both servos to make the nacelles turn the same way.

The first front leg is fixed in place and a rear one is getting there. I abandoned the vertical offset angle just for simplicity, as I'd like to move on to the flight systems.

Next: finish L/G and start on tail.

Sunday, 20 September 2009

L/G - doing things the hard way

Because I want a cargo ramp on the bottom, to allow for a small rover, the ground clearance has to be quite high. I also want the L/G to be sprung to absorb the impact of touchdown, and they'll have to fit at in a tight spot at an odd angle (both vertically and horizontally).

I've spent hours trying to figure out how I want these to mount.


I used the drawing (see previous post) as a template for the parts.

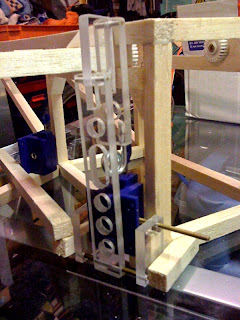
The mock-up of the mech works as expected (shown below, without the "leg" part attached).


They'll be painted eventually.


I had to make a small mod to stop the coil spring clashing with the lower arm.


I think I'll have to make it a bit shorter too.

Landing gear design

I've been working on the design for the landing gear. I had a specific style in mind and it will have to provide enough ground clearance for the payload ramp, some sprung shock absorbtion and work with the odd body angles in the planned loaction. I'll make some parts to check that the concept works and won't conflict with anything before making all of them. I also need to check for conflicts with the nacelle steerer servos.

Friday, 18 September 2009

Nacelle shaft drives

It's a bit tight in there, but the servo drives are coming along. The gears are from an old printer. I'm not entirely happy with this setup though. Can't put my finger on why...


Saturday, 12 September 2009

First nacelle

It took me a while to figure out how I was going to do the steerable arms for the two front EDFs. What I came up with seems pretty strong, and will allow a servo to adjust the angle from inside the main body. I only want the end section with the EDF to rotate, not the whole arm. Distance between centres of each EDF is 500mm.

Friday, 11 September 2009

Work starts on airframe

I started out using wood glue, but it took forever to go off. So I switched to hot-melt and that seems to work a treat.
Still plenty to do, and even with the EDF held in place with just a couple of small bulldog clips, I couldn't resist powering it up... makes me grin everytime!